Archive | October 2018

Archaeology Ideas for Kids

Have you ever wondered what it will be like for future generations to dig up our garbage and try to piece together what we were like as a culture? How will people interpret the uses of our old television sets, microwaves, clothing, and sports equipment? If you have a daughter or son who is interested in archaeology you could have a great time of learning and fun for Social Studies, Langauge Arts, and Science with the following activities.

Make a shoebox of “finds” for your student to investigate. Based upon these finds, they will need to be able to tell what kind of person would have left these artifacts behind. I did this years ago when I was teaching a class and it was so fun! One student brought in a man’s college class ring of their parent and one of the students saw the year they graduated and surmised that it was someone’s grandfather. lol Here is a box that I created about me. See if your observations with the artifacts I have given you are correct.

IMG_4841

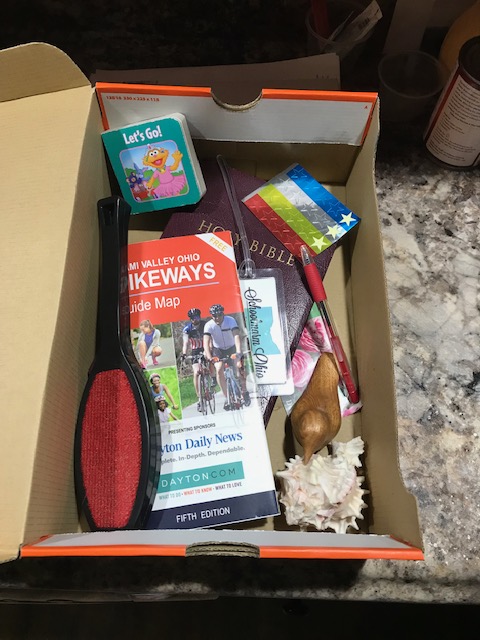
I will list the items that I have in my box and give a brief explanation afterward of each of them.

  • a children’s book (I have a granddaughter; I love children’s lit)
  • the Bible (I like to read, study the Bible)
  • star stickers and a red pen (I am a teacher)
  • a picture of roses (I love flowers; gardening)
  • a luggage tag with a business card inside of it (my business, I enjoy traveling)
  • a bike trail map ( I am an avid bicyclist)
  • a lint brush ( I have a cat)
  • a wooden bird (I love birds)
  • a seashell ( I enjoy the beach; shells)

Here are some reading resources for you and your budding archaeologists to enjoy.

This slideshow requires JavaScript.

The links to books featured above:

Create a Dig Site for your child(ren).Y our daughter/son can create artifacts by either painting a terracotta pot or making clay “coins”. You will need the following items:

  • A terracotta pot
  • paint, paintbrushes
  • clay
  • wooden toothpicks
  • a plastic bin
  • sand
  • plastic shovel
  • a wallpaper brush or a paintbrush
  • string, tape
  • clipboard
  • paper
  • pencil
  • epoxy

First, you need to fill a large bin with sand that will serve as the “dig site” for your artifacts. Next, using the terracotta pot or clay, your archaeologist needs to create artifacts that you will bury. Paint designs on the pot, create coins from clay using the wooden toothpick to make designs. Allow drying time before doing this next step. Use an old towel to cover the pot and a hammer to break it into large pieces. If your child is too attached to their artifact, you can create a design on another terracotta pot to break into pieces.

Bury the artifacts in the sand, but do not allow your archaeologist to see it. Depending upon your child’s age, you can make a grid with string above the bin and attach it with tape to the sides in order for them to know what section from which the artifacts they find originated. Using the clipboard, paper, and pencil, create a duplicate grid on the paper so that the things that are found can be drawn.

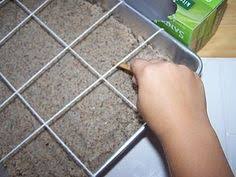
Give your child the shovel and brush to begin to wipe away the sand to find the artifacts. Stress the importance of going slowly and use the brush to wipe away the sand so they don’t disturb the other pieces nearby. Each found piece is then drawn and “cataloged”. If you have broken a pot, then glue it back together after you have excavated the site. Be sure to take a picture for your school year (and to take to your assessment if you do a portfolio review).

You can have your student write or draw pictures about the fun activity that you just completed. They can also write a story about the people who may have used these artifacts.

What about a dessert that shows the layers of soil?

download

Are you interested in an interactive game? This one is from the Colonial Williamsburg website where junior archaeologists can learn about and register their own notes about a dig called Dirt Detective

rainyday

Fossil Digging

I haven’t met a child yet that wasn’t interested in dinosaurs or fossils. I think almost every child (myself included) imagined digging up a dinosaur or at least one bone! The wonderful thing about that dream is we live in an area where fossils are easily found. People come from all over the world to have the opportunity to dig and take treasures home with them. We even have a fossil park that is purely dedicated for that purpose!

Public Places to Fossil Hunt 

Sharonville Trammel Fossil Park

Caesar Creek Lake Spillway

Oakes Quarry Park

Dry Dredgers has lots of great tips for fossil digging if this is your first time. They also have a photo gallery for you to identify your finds!

It’s wise to be prepared by wearing old clothes, taking a garden trowel, a bucket, wet wipes for your hands and your camera to capture those,” Look what I found!” moments. No dig would be complete without a field guide to take with you!  Click on the book for the link.

51a9PJwNNDL._SX258_BO1,204,203,200_

If you are interested in visiting the Answers in Genesis museum, it is not far from downtown Cincinnati and has some amazing animatronic dinosaurs your children will love. Answers in Genesis has a wide variety of books, curriculum, videos, and games for you to purchase, either while you are there, or to order online. Here is just one title of the plethora of books they have for your student. Click on the book for the link.

Screen Shot 2018-10-22 at 5.26.55 AM

National Geographic has a series of books for younger children. I located one that is about dinosaurs. Click on the book for the link.

Screen Shot 2018-10-22 at 5.23.02 AM

Miami University in Oxford, Ohio has a well-kept secret called the Hefner Museum of Natural History. This is a terrific place to see displays and mammoth bones. Also, check into borrowing their Discovery Trunks. They are free of charge and have wonderful examples of 50 different types of fossils. I loved using these because they have fantastic specimens that I would love to have found myself, but alas, never did!:)

Happy Digging!  ~Lisa~

National Chocolate Day

images

Sunday, October 28 is the National Chocolate Day, so why not join the celebration and at the same time make it a learning experience?

Chocolate Sampling

You will need to purchase the following types of chocolate for sampling: unsweetened, milk chocolate, white chocolate, dark chocolate

Break up into pieces each of the different types of chocolate and put them on individual plates. Have each person close their eyes and sample a piece of each type of chocolate. Have everyone rate them from 5 being their favorite to 1 being the least favorite. Reveal to your participants what each type of chocolates was and tally the points each received. You could create a bar graph for math with each of the chocolates.

images-1.jpg

How Chocolate is Made (Science) 

Chocolate comes from the seed of the tropical Theobroma cacao tree.  Cacao, which has been cultivated for at least three millennia, is grown in Mexico, Central America, and Northern South America.  The earliest known documentation of use, of cacao seeds, is around 1100 BC.  The cacao tree seeds have a very intense bitter taste that must be fermented to develop the flavor.

Once the seeds have been fermented, the beans are then dried, cleaned and roasted.  After roasting, the shell is removed to produce cacao nibs.  The cacao nibs are then ground into a cocoa mass which is pure chocolate in rough form.   The cocoa mass is usually liquefied then molded with or without other ingredients, it is called chocolate liquor.  The chocolate liquor may then be processed into two components: cocoa solids and cocoa butter. 

Screen Shot 2018-10-14 at 7.26.45 PM

  • Unsweetened baking chocolate –  cocoa solids and cocoa butter in varying proportions.
  • Sweet chocolate –  cocoa solids, cocoa butter or other fat and sugar.
  • Milk chocolate – sweet chocolate with milk powder or condensed milk.
  • White chocolate – cocoa butter, sugar, and milk but no cocoa solids.
  • Dark chocolate- cacao beans, sugar, emulsifying agent

Some good news about dark chocolate if eaten without any milk: it can lower your blood pressure; it has a large number of antioxidants. Now, that is good news!:)

Language Arts How about having your daughter or son create a story about chocolate or reading this book? (Click on the book to go to the link.)

Screen Shot 2018-10-14 at 7.38.16 PM

Geography

Using the chart of the top ten producers of cacao, locate the countries on a map. Have your son/ daughter read the number aloud to reinforce place value. (math)

Screen Shot 2018-10-14 at 7.27.31 PM

Culminating Activity- Make a chocolate dessert. This can be cookies, pie, ice cream, a malt… There are limitless possibilities, aren’t there?

Enjoy!  ~Lisa~

Overcoming Procrastination

I have a stack of tri-fold boards to grade and I am just stuck on getting them graded. It isn’t that I don’t want to do them, I am frozen in knowing that there are over 30 to grade this weekend and it is going to take hours.

IMG_4781

So, I just avoid the stack and think of a million more things I can do instead of grading them. Things like answering emails or writing a blog post… 🙂 Have you ever been stuck like I am right now? Here is what I am going to do to stop pushing off this task.

  1. Write down what I have to do. Grade boards, enter grades on the grade book website.
  2. Take the first step. Gather up supplies needed. (timer, grading rubrics, a pencil, a marking pen, computer)
  3. Set the timer for 60 minutes and begin grading the first board. This is the only way for me to stay focused on a task like this one that I know is going to take a long time. Other projects require different ways of tacking things. For instance, house cleaning. I clean all of the bathrooms and then I dust and vacuum, and then I sweep and wash the kitchen floor.
  4. Do the next thing. I will grade the next board and the next… Think of your task broken into smaller pieces. I am estimating that I can grade ____ number of boards in an hour. I have no idea how many that will be as some are easier to grade than others, but I do like to make sure I am aware of time so I don’t dawdle over one particular board since I have previously looked at them.

IMG_4782

This is my helper, Oreo, checking to see if I graded correctly.

5. After the timer goes off I will get up and move! Shake the legs, get a drink of water, put in a load of laundry, etc.

6. Get back to the task at hand! Set the timer for another hour and grade more boards. Enter the grades into the grade book. If you cannot devote hours at a time to a task, then break it into 10-15 minute segments of time. You will feel sooo much better once you have started on your task rather than avoiding it.

Things to consider:

  • Putting on some music to help you focus. ( I sometimes listen to instrumental music if a lot of brain power is not required.)
  • Rewarding yourself once the task is completed.
  • Sit back and look at what you have accomplished. If it was a monumental task, take a picture of what you did. No one needs to see the picture but yourself. 🙂 I sometimes do that as a reminder that I DID accomplish more than what I thought I could do to help me conquer the next task.

IMG_4784

After just an hour I only have 12 more boards to grade! Huzzah!

Guess what? I have more than 30 more boards from my other class to grade this week too! Looks like I will be applying this strategy all over again. 🙂

Have a great week of teaching! ~Lisa ~


5 Steps to Organizing Homeschool Paperwork

At this point of the year, you probably have completed several weeks of school and if you are not filing papers, there may be a pile of your scholar’s graded work growing taller each week in a corner of the schoolroom. Believe me, I struggle with this myself! This is currently what I have on my desk. It’s a manageable pile right now, but if I don’t clean it up you know what’s going to be happening. It’s going to look like a mountain in a short time.

IMG_4771

Here are the steps I am going to take so that I can organize those papers and get them off my desk (hopefully).

1. Determine a place for each paper. Use binders and triple hole punch the papers. You can add tabs if you wish that would be according to month quarter, or semester. I find it easier to organize by subject, but you can do it however you wish.

2. Determine the number of papers you are going to keep. Do you have too many papers? After you have checked your daughter’s or son’s work, decide which papers highlight the week. If you are doing a portfolio review/assessment, save the papers that show your student is: learning a concept, or is developing knowledge of the content, and/or papers that show mastery. As I stated previously, keeping the papers in one large binder or separate binders with the subjects labeled will help keep things organized. You do not need to keep every single piece of paper. Now, if your student is working in a workbook, use a bin to hold your workbooks or a shelf on which to keep them.

IMG_4774

As you can see from the picture, my bookshelf has some shelves that are taller than others, so I have a mixture of binders and books. The other thing that I am not showing you is that it is located in a clothes closet so that I can hide my binders. My husband and I share a small office space and he is much neater than I am. I try to keep my things from spilling into his space. 🙂

3.  File papers often. Do not wait until you have a pile that is so high that you just pick it all up and throw it in the recycling bin. Although, that is extremely tempting to do, isn’t it?

4. Make filing and organizing a part of your daily routine. If you do this every day then there won’t be a pile! If you do not have time to do it, then have your daughter or son file those papers. You can show her/ him where you would like the papers to be kept and, “Wa!La!” it is finished. Not only is there not a pile of papers, but you are teaching important household and organization tips that will serve them well for a lifetime.

5. Take pictures! If you have lots of artwork or projects, display them for a time and then let your child know that you are going to take a picture so that you always have a record of what they have done. You can create a photo collage at the end of the year that will be memorable.