Archives

Cooking with Your Kids

Teaching your daughter or son to cook is not only fun but a great way to incorporate health and math into the activity. Who says that homeschooling has to be all bookwork??

I saw this book title, Cooking Class by Donna F. Cook, when I was perusing the internet and decided to get it at the library. It not only has recipes, but also has terms that are commonly used in recipes such as dice, chop, blend, and sauté.  In regards to teaching health, there is a section that discusses washing hands and the proper handling of food.  Measuring ingredients is a practical way of teaching fractions and being precise, which sometimes children have difficulty in understanding. Of course, we know this is extremely important in cooking, otherwise, the recipe can be ruined.

I’ll never forget the first time my mom let me make brownies on my own. Desserts were a rare treat at our house when we were growing up and when I was allowed to make them I was ecstatic! I was anticipating licking the bowl and the delicious taste of a brownie with milk. Well, I did not read the recipe correctly and instead of 1/4 cup of water, I added 1 1/4 cups and they were totally ruined! Wahh! Talk about a terrible mistake. 😦

IMG_4074

You may have picky eaters at your house and, believe me, I know what that is like! I, unfortunately, was the picky one at my house. I had a really great sense of smell and I believe I could taste things much more than others. So, everything was really sour or really spicy, funny how nothing was ever too sweet though!  If you have a child like that, I feel their pain, oh, I meant yours. lol Perhaps this recipe for roasted vegetables will help alleviate the Battle of the Veggies. If not, keep having them try a spoonful and one day they will eat them! I am almost a total vegetarian now. My mom would be so proud of me.

IMG_4081

If you don’t have access to the book, then here are some other recipe ideas that you can use when teaching your aspiring cook.

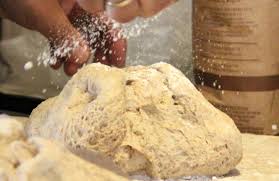
How about Bread in a Bag? Yes, you read that right! Your baker puts all of the ingredients in a gallon sized bag and mixes it all up by kneading it inside the confines of the bag! It makes two mini loaves and I am sure your son will gobble up the bread he has made. The hardest part will be waiting for it to cool enough to slice. Best Bread in a Bag Recipe

download-2

Have you tried spaghetti squash? This is so fun to make with your children! I love the transformation that vegetable goes through! While it really doesn’t taste like spaghetti, the fibrous insides of the squash do resemble it and your daughter will enjoy scraping the squash to see it come apart in strings.

download-1


Baked Spaghetti Squash Recipe  (recipe from cookingwithmykid.com)

Prep Time: 15 mins  Cooking Time: 45 mins to 1 hour

Ingredients:
1/2 pound ground turkey or hamburger (optional)
1 tablespoon olive oil
1 large spaghetti squash
1 egg
2 cups spaghetti sauce
1 cup part skim ricotta cheese or cottage cheese drained
1 1/2 cups part skim shredded mozzarella cheese
1 teaspoon fresh oregano
5 fresh basil leaves, torn
salt & fresh ground pepper
4 10 oz ramekins

Preheat the oven to 350 degrees. Poke the spaghetti squash 10 times and microwave for 10 to 12 minutes stopping every 3 to 4 minutes to turn. You’ll know it’s done when the skin starts to buckle. Remove and split open. While it’s cooling off, heat a non-stick pan over medium-high heat for 3 or 4 minutes. Add oil to the pan and blot the turkey meat dry before adding to the pan. Space the meat out in the pan and cook until it is just brown on both sides. As long as it is browned, it can be a little undercooked. It will cook the rest of the way in the oven. Set aside and begin scraping out your squash with a fork. Transfer scraped squash into a colander and let drain while you are prepping the rest of the ingredients. In a large bowl, mix together sauce, ricotta, egg, 1 cup of cheese, oregano, basil and salt & pepper to taste. Mix in the drained spaghetti squash until it’s all well combined. Place one scoop of squash mixture in each ramekin covering the bottom. Layer browned meat on top of squash mixture and then place another scoop of squash on top of the meat. Sprinkle remaining cheese on top of each and place on a cookie sheet. Bake for 35 to 45 minutes or until cheese is melted and bubbly and squash looks set. Remove from oven and let cool for 5 minutes before serving. PS: If you don’t have ramekins, you can make it in a pie pan as you would a spaghetti pie.

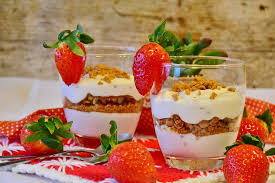
Yogurt parfaits are easy to make and can be customized for each person’s taste preference. 

Yogurt Parfait
In a glass (so you can see the layered effect) add the following ingredients in order.
2 tablespoons of  yogurt
1-2 tablespoons of granola (This varies according to your preference.)
Blueberries or sliced strawberries (buy organic- conventional have the highest amount of pesticides of all fruit)
Repeat layers until glass is full.

images

Here’s a recipe that even little ones can help you make from laughinhkidslearn.com

Healthy Bites (Toddlers can make too!)

Ingredients  
2 cups rolled oats
* 1/2 cup raisins
* 1/3 cup cranberries
* 1 tsp marmalade or orange peel (optional)
* 1/2 cup applesauce
Steps
Throw it all into a bowl and mix well.
Roll into small balls
Bake for 10 minutes or until golden brown (350F)
Happy Cooking and baking!
~ Lisa ~


5 Ideas for Teaching Health in your Homeschool

When some homeschool moms come to see me for their written narrative and I ask them about what did they teach or do for health I get a panicked look. I assure them that they have been teaching health all along, but that it is advised that they have a plan to cover specifics topics throughout the year. So, what kinds of topics do I suggest?

Disease Prevention-  Discuss with your son the importance of covering his mouth when he sneezes or coughs. I just came up with this idea to make the point of germs being airborne. You will need:

1 taper candle

1 candlestick

1 lighter

Light the candle and place it on a table. Have your son gently blow one time in the direction of the candle. See how his breath made the candle flicker. Have him continue to blow (or cough) as he backs up one foot. Continue this until the fame no longer flickers due to his blowing (coughing). I think you will be surprised at how far germs can be spread by not covering your mouth (up to 18 feet according to a few internet sources).

download Of course, the same idea goes for sneezing. According to wonderopolis.org, sneezes can actually travel as far as 200 feet! Ewww.  Have a discussion on which technique is most effective in stopping the spreading of germs. Is it sneezing into the hand? How about the elbow? Or is it a facial tissue or a handkerchief? Here is a Mythbuster video about testing these various methods “Catching your sneeze”.

Washing Your Hands helps to lessen the spread of disease as well. If you have a daughter who loves to cook, how about whipping up a batch of agar to grow bacteria? By making your own and then swabbing areas of your house that she thinks collects germs, she will be excited to see the bacteria begin to grow. Mad About Science has the recipe for you to make your very own agar. CLICK HERE As part of the experiment, have your daughter create a list of suggestions on places throughout your home where germs will be bountiful. Swab away! (Right after I finished writing this paragraph I went and disinfected my toilet handle. lol)

Eating Healthy Growing up, the FDA called the guide to eating healthy, the Food Pyramid, but now the title is Choose My Plate. Harvard has a great visual that explains the guide in more depth. Too bad potatoes and French fries don’t count. 😦Screen Shot 2017-12-18 at 10.41.53 AM.png

Have your family make a list of healthy snacks and meals that they will enjoy. We are not big bean eaters here, so making a black bean soup would be a waste of money and time. Choose dishes your family will enjoy. Try being adventurous and add a new vegetable every couple of weeks. As an adult, my vegetable eating has expanded beyond corn, broccoli, and cauliflower. Have you tried zoodles (zucchini noodles) or spaghetti squash? These are both fun for the children to try and they have such a mild taste that you can’t really taste the squash themselves.

Ideas for expanding the healthy lifestyle and incorporating school are:

  • Create a bar graph-Ask each family member what is their favorite vegetable. You can have three choices to make it easier (corn, green beans, peas). Share the results at the dinner table and serve the overall favorite.
  • Write a menu using the Healthy Eating Plate as your guide. Purchase the ingredients and have your son or daughter help if possible,
  • Create placemats with the Healthy Eating Plate as the design. You can do this by tracing one of your plates onto a piece of copy paper and copying the design and categories onto your plate. Your daughter may wish to decorate her plate’s border. If she isn’t writing and reading quite yet, make a photo collage of each category using grocery ads for pictures. Have the placemats laminated for longevity.

Exercise With the beginning of winter upon us, getting outside to burn off steam can be difficult. How about some of the activities I mentioned in my previous PE blog? If you would like your son to get some stretching and flexibility exercises, here is a YouTube video that is for young elementary students pretending to be different animals from around the world: CLICK HERE  I know you want to work out with your kids :), so here is a video for all of you: Kids Workout Video.

Rest!  It is extremely important for your son to get a good night’s rest. By allowing your body to rest, it gives it time to repair itself as well as rejuvenate and be ready to go for the next day. Without the proper amount of sleep, he cannot perform as well with his schoolwork and other activities. According to sleepfoundation.org, school-age children need between 9-11 hours and teens need 8-10 hours. If your son is having trouble getting to sleep, try increasing his level of activity during the day. I found this to be true with my sons.

Have a great day!

~Lisa


10 activities for Teaching Physical Education in Your Homeschool

download

Calisthenics, running laps, and taking showers are the first things that pop into my mind when I think of Physical Education. I believe this is because of the dreaded PE classes I had to take when I was in high school. I say dreaded because I wasn’t the athletic type and my endurance was pitiful. 😦 You can certainly do this as there is value in doing so, but here are some more ideas for your homeschool.

Sports teams and classes that are offered at the YMCA, gyms, or community centers can be counted as part of your Physical Education curricula. If that is not a possibility, then you can teach PE at home.  The main emphasis is providing activities for aerobic activity and fitness to your youngster.

Obstacle Course– You can create a simple course for your young athlete or make one more complex for your older child. If you are able to get outside you can incorporate a play set as part of the experience. Using a jump rope to walk along provides balance and you can lay it straight or fashion it into an S if your daughter needs a greater challenge. Have her throw a ball at a paper target, use a hula hoop for dual purposes to jump in as it is lying on the ground, and also set a number of prescribed rotations to complete. Crawling or hopping a certain distance gets those large muscles moving. The possibilities are endless. If you have an older student, have them create the course under your supervision. To make it even more fun and challenging, use a stopwatch and record the time it takes to complete the course. Each time your competitor can see if she can beat her previous time. To further extend this activity you can rearrange the course.

Indoor courses are fun and a wonderful energy- burner in inclement weather. You just need a large enough area to be able to set up your course. Normally I would not let my children walk on the couch, but part of the fun and allure for my boys to do this was they were allowed to crawl across the couch.lol  You can always put the cushions on the floor and have your son walk on them or hop from one to another. Here are additional things to do with your course. I have combined large and small motor skills since both need to be developed.  Tossing socks into a laundry basket; crawling under dining room chairs; lying down and scooting on your back; balancing a book on your head while walking to the next activity; hopping on one foot from one place to another; crab crawling; dropping 10 pennies in a cup; stacking plastic cups in a pyramid, etc.  I can see the wheels turning as you think about your own house and children. 🙂

Hide and Go Seek was a favorite activity for my children. This can be done indoors or out. Just a couple of rules need to be established. For instance, boundaries (outside- don’t go beyond the fence line or indoor areas that may be unsafe or you don’t want the children playing in or near).

Play Follow the Leader

Indoor bowling– Use 10 empty 1 or 2-liter plastic bottles and a tennis ball to play. Keep score and the one who reaches 50 wins. A variation of this would be to use a small beanbag and ten plastic cups that are in a pyramid. This would be a great challenge to older kids since this requires skill and patience.

Play Twister If you don’t have the game, then create it by taping red, blue, green and yellow construction paper circles on the carpet and writing the directions on index cards. (right food red, left foot green, etc)

images-1.jpg

Balloon Games This is such a fun and inexpensive way to get your children moving. Blow up a balloon and have your child put it between their legs and walk from one end of the hall to the other end.

Balloon Tennis– You will need a 12-inch balloon, two paper plates, two paint stirrers, a glue gun, and masking or painters tape. Glue each stirrer to a paper plate to create your two tennis racquets. Using the tape, create a line (tennis net). See how many times the children can hit the ballon over the line. A point is awarded to the other person if you cannot return the balloon. The first person to reach 10 points wins. Balloon volley is the same idea- just without the racquets.

Body Balloonball– How many ways can you hit the balloon and keep it from touching the floor NOT using your hands? Keep score and if you have a partner, the first to use 5 different body parts gets one point. The overall winner is the first to reach 10.

Beanbag Toss– Your son can toss the beanbag at various targets on the floor (a laundry basket, see if he can land a beanbag inside a shoe, a paper towel that has a bull eye on it, etc.). If you have a little one and would like to incorporate more school subjects, how about a game that they need to toss the bag onto a certain color or a certain number? You can tape on the floor construction paper of primary colors and have additional papers with numbers. Call out directions (hit the green square. Hit the paper with the numeral 5 on it.) Let the game begin!

Tape Lines: Make 5-10 separate lines of tape, each about a foot apart, on your floor or carpet. Label the first one the “start” line and then give your kids simple instructions:

  • Long Jump: See how many lines they can jump over. Have them try and beat their best score each time. Experiment with arm swinging vs. arms behind their backs.
  • Run ‘n’ Jump: Now let them take a running start and see if they can jump even further!
  • Long Jump Backwards: Increase the difficulty by performing the tasks jumping backward.
  • Hop: How far can they jump on one leg?
  • Reach ‘n’ Stretch: How far can their leg reach with one foot on the “start” line?                                                                                                     Source: Whatmomslove.com

As with all physical activity, have your son or daughter stretch before and after so those muscles stay in great shape! 🙂

~ Lisa


Homeschool Rocks

2b05a665aee45d835b05a50946798419--the-rock-rock-rock

Picture from Pinterest

Each year our church fellowship has a week-long camping event with food, fun, campfires, and families. With almost half of our small group being children, activities throughout the week are something that we need to have for them to do. I saw a facebook group called Homeschool Rocks and thought decorating and hiding rocks with encouraging words or pictures would be a fabulous idea for our campout. Perhaps you might like to do it with your children too. I have included academic areas for you in parentheses so you can see how it applies to school. 🙂

You Will Need:

rocks

a bucket of warm, soapy water

paper towels

a pencil

outdoor acrylic paints

paint brushes

newspaper

waterproof markers

Elmer’s glue

Modge Podge or some type of outdoor sealant

paper

a plastic jar or another container

plastic grocery bags- one per person

Instructions: 

  1. Collect First of all, you and the children collect rocks that you want to paint. The best kinds are smooth, especially for younger children since they will paint more easily.  (PE is covered since you are getting exercise hunting for rocks.)
  2. Clean After you have determined which rocks you would like to paint, clean them in a bucket filled with warm, soapy water. Rinse them and place on some paper towels to dry. The paint will adhere much better to a clean surface, and your children will be getting their dirty hands clean at the same time. (Health- Getting all that dirt and grime off is part of a healthy routine.)
  3. Paint Now it’s time to bring some life to those rocks! Cover a table with newspapers, and if you have small children who might get paint in more places than the rock, cover them too (an old shirt and pants will do the trick). Depending on what design you want to create, you may want to sketch lightly on the rock before applying the paint.  If details are being added, then a waterproof marker would be helpful to use. Outdoor patio paints are preferred so the rock weathers well. Allow to dry for several hours. (art)

710UNU6HvXL._SL1000_

  1. Seal  In order for your awesome rocks to be enjoyed for a long time, a sealant such as Modge Podge should be used. This will make the designs weather resistant and shiny. NOTE: If you have used permanent markers on the rocks, apply a thin layer of glue before applying the sealant to prevent smudging. Allow to dry according to the directions on the jar. 41O7V5Vq2FL
  2. Hide No, not you, the rocks! Since we will be camping, the children will go and hide their rocks so that fellow campers can find them. Each person that has hidden a rock can write a clue for others to find their treasure, thus creating a scavenger hunt.  (clues- writing;  directions- math, social studies)
  3. Find Put all of the clues in a plastic jar or other container and have each participant draw out a clue until they are all gone.Give each person a plastic grocery bag. Tell everyone to see if they can locate that rock based upon the clue. Help little ones who can’t read.
  4. Display Have a rock show so that everyone can enjoy the decorated creations.

I think everyone is going to enjoy doing this activity that it can be repeated as many times as you like. I would love to have you post your pictures if you do this.

~Lisa 

3 Books about Manners

Recently I discussed the importance of manners. This week I have a few more books to add to a study on manners. Author, Julia Cook, has written several stories about various topics about social skills.

61R0LNMv9nL._SY498_BO1,204,203,200_

Table Talk is about… table manners! Here is a quote from the book, “Did you know that table manners really matter? They’re more than just eating. They’re about being kind and considerate of others, and being respectful of people’s feelings.” Some things mentioned are washing your hands, waiting your turn until everyone has their food, saying please and thank you and not reaching across the table for something. After reading the book you can practice the good manners that you read. Do you know the poem, The Goops?  Here is the poem for copywork. NOTE: Whoops! I accidentally left out the word saw on the first line!  The Goops


Screen Shot 2017-05-29 at 7.54.39 PM


Bragging is the focus in the book, Well I Can Top That! 

Bradford Robert Alexander Donely always feels the need to be better than his friends. Primarily by telling outlandish tales, he appears to do everything better. His teacher helps him to see that instead of being a “one-upper”, he can be a “pull-upper”, in other words, encourage people and allows others to be number one.

518VY8j0cpL._SY498_BO1,204,203,200_

Decibella and her 6 inch Voice

One of my sons had a difficult time in using what I called an “inside voice”.  He also had a friend who was equally as noisy and we had to remind the boys on many occasions to consider others around them. Decibella, or rather, Isabella, is a young lady who needs to be reminded of which voice to use throughout the day. Ranging from the whisper, to a 6 inch voice, to SLURPADOODLE, Isabella must learn to gauge her voice to meet the appropriate noise level, depending upon the situation.

61gg60FozcL._AC_US218_


What kind of things you can do with these books when you are reading to your children?  Ask if they have ever had these situations happen to them. What ways could the characters do things differently? Why is it a pleasant thing to have manners? How can you show kindness and consideration to others. Make a list of opportunities. Discuss and practice the following social skills.

cefb9f4a93a6d6b27bf67f2a3c181e30